Essential Drupal 7 Modules

Each time I build a new Drupal 7 site, I get the chance to try out multiple modules to address a particular problem. Some of these work out, some of these do not.

Below is a list of modules that I consider to be essential and should be installed by default when you begin building a site.

  • Module Filter – The modules list page can become quite big when dealing with a fairly large site or even just a dev site meant for testing new and various modules being considered. What this module aims to accomplish is the ability to quickly find the module you are looking for without having to rely on the browsers search feature which more times than not shows you the module name in the ‘Required by’ or ‘Depends on’ sections of the various modules or even some other location on the page like a menu item.
  • Pathauto – The Pathauto module automatically generates URL/path aliases for various kinds of content (nodes, taxonomy terms, users) without requiring the user to manually specify the path alias. This allows you to have URL aliases like /category/my-node-title instead of /node/123. The aliases are based upon a “pattern” system that uses tokens which the administrator can change.
  • Redirect – Common API for loading, saving, and deleting redirects, Case-insensitive redirect matching with a hook to allow other modules to narrow-down the candidate redirects, Redirect counter and last used timestamp, with automatic cleanup of inactive redirects, Integration with Drupal’s page cache to optimize redirects and performance, Complete individual redirect access API and Views API integration.
  • Views – Using the Views module, you can fetch content from the database of your site and present it to the user as lists, posts, galleries, tables, maps, graphs, menu items, blocks, reports, forum posts etc. Different content types including nodes, users, and other bundles can be displayed.
  • Views Bulk Operations – This module augments Views by allowing bulk operations to be executed on the displayed rows. It does so by showing a checkbox in front of each node, and adding a select box containing operations that can be applied. Drupal Core or Rules actions can be used.
  • Admin Views – Filter all administrative views via AJAX, Perform any kind of bulk/mass operations on items in administrative views, Filter content by title, node type, author, published status, and/or vocabulary, Filter comments by title, author, node title, or published status, Filter users by name, ban/blocked status, or user roles.
  • Field Group – Fieldgroup will, as the name implies, group fields together. All fieldable entities will have the possibility to add groups to wrap their fields together. Fieldgroup comes with default HTML wrappers like vertical tabs, horizontal tabs, accordions, fieldsets or div wrappers.

More to come…

Headless VirtualBox on CentOS 6

My latest task at work was to setup a server running virtual box to allow all of the developers access to all test machines and to allow us to keep the virtual machines up to date (by updating one set of appliance rather than multiple sets).

I found an excellent tutorial on how to do that here.

After you follow the tutorial to the letter and have your Headless VirtualBox and phpVirtualBox running, you’ll need to add your virtual machines. We already had several that we were actively using so I set out to import them into the new environment.

This was met with resounding failure.

The import feature was not working for me (Could not create the clone medium ‘/path/to/VirtualBox VMs/Disk1.vmdk’ (VERR_VD_VMDK_INVALID_FORMAT)). So I scraped the .ova files that I had exported and copied over the vmdk files – the hard drives of the virtual machines. Once these were added to the virtual box users home directory and chown’d accordingly, I created new machines in the phpVirtualBox interface. For each new Virtual Box, I selected already existing Hard Drives.

Some minor tweaks were required (like removing the CDROM’s) so they would boot, but after that, we were able to connect no problem.

There was an issue with the overall phpVirtualBox throwing errors after clicking on anything. It turned out to be we added (or came with the clean install) a vboxnet0 ethernet connection under File > Preferences > Network. Removing that solved the error (The object functionality is limited (0x80070005)).

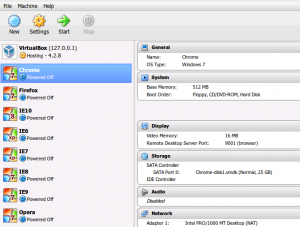
So, now we have the following virtual environments and all are working extremely well and fast:

Windows XP – Internet Explorer 6
Windows 7 – Chrome (current)
Windows XP – Internet Explorer 7
Windows 7 – Internet Explorer 8
Windows 7 – Internet Explorer 9
Windows 8 – Internet Explorer 10 (To get this appliance check out this site)
Windows 7 – Firefox (latest)
Windows 7 – Opera (latest)

Sadly, MAC OS is not supported by Virtual Box, so we have to continue to use our MAC test machine over this new virtual test environment.

There is a Safari 5.1 for Windows so I may create another appliance for that.

Hope this helped.

New Munin Template

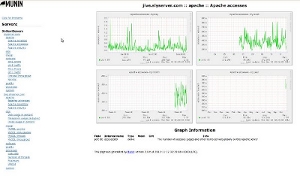
After searching for a template for Munin that was a little easier to use than the standard, I came across the Raven template by Simian Uprising. This worked great for Munin 1.2.x but does not work for version 2.0.x. So, rather than use the standard template or fix Raven, I created a new template called Modern.

This theme has been testing in the Chrome browser only but should work in all the majors.

Update 2014-10-18: The Theme can now be found on Git Hub: https://github.com/sjoudry/modern-munin

Incremental Snapshot Backups with Rsync

Alright, the inaugural post!

Background

One of the most recent challenges at work was to implement a system to backup our internal servers to a local backup device and to a remote backup device. This covers my ass in the event of a fire at the office or a hurricane or whatever.

The existing backup was a 7 day rolling snapshot backup which was better than nothing. However the solution was not as elegant as what I am proposing here.

The inspiration for this solution comes from here where Mr. Rubel outlines how to create incremental backups using rsync/cp -al and also using rsync/–link-dest. For my purposes rsync/–link-dest was the answer.

The Solution (in Theory)

The solution is hard links. If I create a file called “unique” I have one physical file and a link to that file. If I then create another link to the same file called “not_unique” I still only have one physical file but there are now two links to it. If I remove one link, the file remains. If I remove all links, the file is destroyed. As usual, Wikipedia explains it well.

So, based on that theory, the idea is to create a complete snapshot backup once and only once. After that, incremental backups would be created using hard links.

  • Any files that have been added since the last incremental backup would be created in the current increment.
  • Any files that have been changed since the last increment would be re-created in the latest increment (which would preserve the state in previous backups).
  • Any files that have been removed since the last increment would be removed from the current increment (which would again preserve the state in previous backups).

The only hit to the disk is for files that have changed. The links take space, but it’s minimal.

Demonstration

First, I create the initial backup. I’m using -i on the ls command to show the inode id of the file:

$ ls -lRi
.:
total 12
41451556 drwxr-xr-x 2 scott scott 4096 2012-11-06 22:28 2012.11.06/

./2012.11.06:
total 12
41423324 -rw-r--r-- 1 scott scott 93 2012-11-06 22:28 existing_file

Next, I create the first increment with a new file added. Make note of the inode id number that I have coloured to show the hard links:

$ ls -lRi
.:
total 16
41451556 drwxr-xr-x 2 scott scott 4096 2012-11-06 22:28 2012.11.06/
41451557 drwxr-xr-x 2 scott scott 4096 2012-11-06 22:32 2012.11.07/

./2012.11.06:
total 12
41423324 -rw-r--r-- 2 scott scott 93 2012-11-06 22:28 existing_file

./2012.11.07:
total 16
41423324 -rw-r--r-- 2 scott scott 93 2012-11-06 22:28 existing_file
41423328 -rw-r--r-- 1 scott scott 143 2012-11-06 22:32 new_file

Next, I create the second increment and update the existing file. The first two versions of the file have the same inode id and the third is different:

$ ls -lRi
.:
total 20
41451556 drwxr-xr-x 2 scott scott 4096 2012-11-06 22:28 2012.11.06/
41451557 drwxr-xr-x 2 scott scott 4096 2012-11-06 22:32 2012.11.07/
41451558 drwxr-xr-x 2 scott scott 4096 2012-11-06 22:38 2012.11.08/

./2012.11.06:
total 12
41423324 -rw-r--r-- 2 scott scott 93 2012-11-06 22:28 existing_file

./2012.11.07:
total 16
41423324 -rw-r--r-- 2 scott scott 93 2012-11-06 22:28 existing_file
41423328 -rw-r--r-- 2 scott scott 143 2012-11-06 22:32 new_file

./2012.11.08:
total 12
41423329 -rw-r--r-- 1 scott scott 0 2012-11-06 22:38 existing_file
41423328 -rw-r--r-- 2 scott scott 143 2012-11-06 22:32 new_file

Finally, I create the third increment and remove the original file. The first two versions of the file have the same inode id as before, the third is different as before but the fourth version is missing as expected:

$ ls -lRi
.:
total 16
41451556 drwxr-xr-x 2 scott scott 4096 2012-11-06 22:28 2012.11.06
41451557 drwxr-xr-x 2 scott scott 4096 2012-11-06 22:32 2012.11.07
41451558 drwxr-xr-x 2 scott scott 4096 2012-11-06 22:38 2012.11.08
41451560 drwxr-xr-x 2 scott scott 4096 2012-11-06 22:50 2012.11.09

./2012.11.06:
total 4
41423324 -rw-r--r-- 2 scott scott 93 2012-11-06 22:28 existing_file

./2012.11.07:
total 8
41423324 -rw-r--r-- 2 scott scott 93 2012-11-06 22:28 existing_file
41423328 -rw-r--r-- 3 scott scott 143 2012-11-06 22:32 new_file

./2012.11.08:
total 4
41423329 -rw-r--r-- 1 scott scott 0 2012-11-06 22:38 existing_file
41423328 -rw-r--r-- 3 scott scott 143 2012-11-06 22:32 new_file

./2012.11.09:
total 4
41423328 -rw-r--r-- 3 scott scott 143 2012-11-06 22:32 new_file

The Solution (in Practice)

I created a starting point using the following command:

rsync -avzh --delete SOURCE -e ssh root@SERVER:PATH
  • SOURCE is the absolute path on the source device.
  • SERVER is your destination device (IP Address or domain name)
  • PATH is the absolute path on the destination device where the backup will be created

Next, I created the first increment:

rsync -avzh --delete --link-dest=PATH1 SOURCE -e ssh root@SERVER:PATH2
  • SOURCE is the absolute path on the source device.
  • SERVER is your destination device (IP Address or domain name)
  • PATH1 is the absolute path on the destination device that rsync will copy to create the next increment.
  • PATH2 is the absolute path on the destination device where the backup will be created

Finally, I created a script to run via cron nightly:

#!/bin/bash

CURRENT=PATH/$(date +'%Y.%m.%d')
LINKDEST=PATH/$(date +'%Y.%m.%d' -d "yesterday")

ssh root@SERVER mkdir -p $CURRENT
rsync -avzh --delete --link-dest=$LINKDEST SOURCE -e ssh root@SERVER:$CURRENT
  • SOURCE is the absolute path on the source device.
  • SERVER is your destination device (IP Address or domain name)
  • PATH is the absolute path on the destination device where the backup will be created

This script requires that you have set up authorized keys. This is explained here.